A dull knife in the field is not just an inconvenience. It slows down skinning, damages fur, and increases the risk of injury. When you’re three days from the truck with a dozen beaver sets to check, you need your blade working — not almost working.
This guide covers what actually matters: how to maintain an edge on high-alloy steels without a bench grinder, how to protect the blade from moisture and blood, and how to make the right call on abrasives before you leave camp.
What Makes High-Alloy Steels Different in the Field?
High-performance steels like D2, S30V, CPM-3V, and Scandinavian grades (Böhler K720, Sandvik 14C28N) hold an edge significantly longer than standard stainless — but they demand more from your sharpening kit.
- D2, for example, sits at 60–62 HRC and can hold a working edge through 40–60 skinning cuts before needing touch-up, compared to 15–20 cuts for a typical 420HC blade.
- The tradeoff: That hardness makes the steel more brittle and harder to reprofile in the field if you roll or chip the edge.
- CPM-series steels (CPM-S30V, CPM-154) use a powder metallurgy process that distributes carbides more evenly, which means finer, more consistent edges — but also means a coarse diamond stone will leave a rougher scratch pattern than on simpler steels. You need finer grits to finish properly.
- Scandinavian steels like Sandvik 14C28N are softer (57–59 HRC) and easier to sharpen with a basic ceramic rod, but they’ll need touch-up more often in wet conditions.
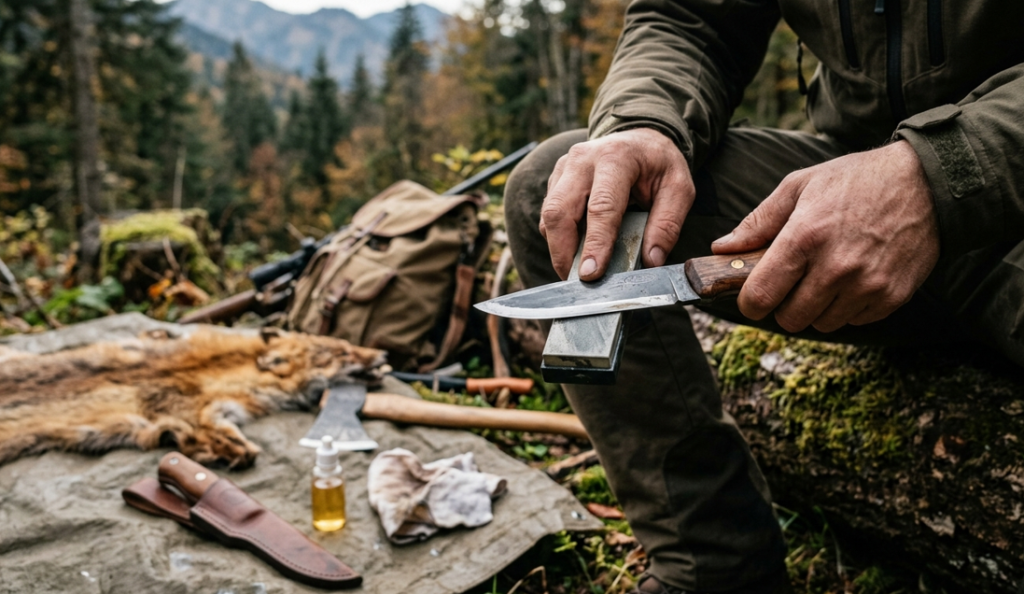
Choosing the Right Field Sharpening Kit
You don’t need much. You need the right things.
- Diamond paddle or folding diamond stone (220/400 grit) — for reprofiling a rolled edge or removing a chip. DMT Diafold or Lansky Diamond Paddle both pack flat and weigh under 3 oz.
- Ceramic rod or pocket ceramic stone (600–1000 grit equivalent) — for regular touch-up between animals. Spyderco Sharpmaker rods or a simple Fallkniven DC4 cover this.
- Leather strop with compound — for finishing and deburring. A 4-inch piece of veg-tan leather glued to a wooden block with green chromium oxide compound is enough to restore a mirror edge after ceramic work.
Total weight: under 6 oz. It fits in a shirt pocket.
“Most guys reach for the diamond stone when they should be reaching for the strop. If your edge feels dull after two or three animals, nine times out of ten you’ve got a wire burr folded over — not a dull edge. Three passes on leather fixes it in 30 seconds. Save the abrasives for when you actually need them.”
How to Sharpen in the Field: Step-by-Step
The goal is to maintain geometry, not rebuild it. Rebuilding geometry takes a bench setup. Field work is about keeping what you already have.
- Assess the edge first. Run your thumb pad lightly across the edge (not along it). A burr feels like a slight catch. A rolled edge feels smooth but won’t bite paper. A chip you’ll see or feel as a gap.
- Match your tool to the problem. * Burr → strop.
- Rolled edge → ceramic rod, 5–8 passes per side at your blade’s bevel angle.
- Chip → diamond stone to remove material past the chip, then ceramic, then strop.
- Hold your angle consistently. This is where most field sharpening fails. D2 and S30V are typically ground at 20–22° per side from the factory. Scandinavian grinds run flatter — 12–15°. If you don’t know your angle, use a Sharpie: coat the bevel, make three passes, and see where the abrasive is removing steel. Adjust until you’re hitting the full bevel.
- Work in sets, not strokes. Five passes per side, alternate sides, check progress. Don’t grind one side to a mirror and then try to match the other.
- Finish on the strop. Always. Ten passes per side on leather removes the wire edge and aligns the final apex. This step alone can take a mediocre sharpening job to a clean, hair-popping edge.
Steel Comparison: Field Sharpening Difficulty vs. Edge Retention
| Steel | HRC | Edge Retention (relative) | Field Sharpening Ease | Corrosion Resistance | Best Field Abrasive |
| D2 | 60–62 | High | Moderate (needs diamond) | Low-moderate | Diamond + ceramic |
| S30V | 59–61 | High | Moderate | Good | Diamond + ceramic + strop |
| CPM-3V | 60–62 | Very high | Difficult | Low | Diamond only in field |
| Sandvik 14C28N | 57–59 | Moderate | Easy | Excellent | Ceramic rod + strop |
| 1095 Carbon | 56–58 | Moderate | Very easy | Very low | Any stone |
Protecting the Blade After Skinning: What Actually Damages Steel
Blood, fat, and water are the three things that will destroy a blade faster than any abrasive. Blood is mildly acidic and begins etching uncoated carbon steel within hours. Fat traps moisture against the steel. Water — especially in freeze-thaw cycles — works into micro-pits and accelerates oxidation.
Think of it like a trap chain left in a beaver pond without waxing: the steel isn’t failing because of the water alone, it’s failing because of the combination of water, organic acids, and oxygen working together over time. The same process happens on your blade after every animal.
The fix is simple and takes 90 seconds:
- Wipe the blade clean immediately after use with a dry cloth or paper towel.
- Run a light coat of food-safe mineral oil, Ballistol, or Renaissance Wax along the flat and into the choil.
- Store the knife out of the sheath when possible. Leather sheaths hold moisture against the blade.
“D2 and CPM steels are not stainless in any practical sense when you’re working in blood and water all day. I’ve seen D2 blades develop surface rust in under 12 hours in wet conditions. Ballistol is my standard — it’s non-toxic, works as a light lubricant on the pivot if you’re running a folder, and one small bottle lasts a full season.”
What Happens When You Ignore Edge Geometry?
A trapper working a 60-set beaver line in Minnesota reported that after two weeks of field use without proper sharpening, his S30V skinner had developed a secondary bevel — an unintentional micro-bevel from inconsistent angle work on a ceramic rod. The blade still cut, but it required 40% more pressure on the pull stroke, which slowed skinning time per animal from 8 minutes to nearly 14. He reprofiled on a diamond stone back at camp, restored the original 20° bevel, and returned to baseline performance. The lesson: inconsistent angle costs you time, not just sharpness.
Does Sheath Material Matter for Long Trips?
Yes. Leather is traditional and looks right, but it holds moisture and can harbor bacteria that accelerate corrosion on carbon and semi-stainless steels. Kydex or injection-molded nylon sheaths dry faster and don’t compress against the edge. If you’re running a leather sheath, treat it with neatsfoot oil to reduce moisture absorption, and never store a wet blade in it overnight.
For extended backcountry trips — 10 days or more — consider a secondary dry storage option: a simple zip-lock bag with a silica gel packet keeps a sheathed blade in stable humidity even in wet camp conditions.
The One Thing Most Trappers Skip
Deburring after every sharpening session. A wire burr is invisible to the eye but destroys edge performance within the first two cuts. After any abrasive work — diamond, ceramic, or even a few strokes on a field stone — always finish with a strop. Always. It takes ten seconds and it’s the difference between a blade that performs and one that almost performs.
Your knife is the most-used tool in fur harvesting work. Keeping it sharp isn’t maintenance — it’s part of the job.For further reference on steel metallurgy and heat treatment standards, see the American Knifemakers Guild technical resources and Crucible Industries’ published data sheets on CPM steel grades.