What Happens in the First 30 Minutes After Harvest Determines Everything
The quality of a finished pelt is decided before you ever reach your truck. Once an animal is harvested, enzymatic breakdown begins immediately. In warm conditions above 50°F, you have roughly 30 minutes before bacterial activity starts degrading the hide. That window is your most critical asset.
Cool the carcass fast. If ambient temperature allows, hang the animal in shade with the body cavity open. In warm weather, pack ice around the carcass — not directly on the pelt — to slow decomposition without introducing moisture that accelerates slippage.
Field scenario worth knowing: A trapper working a beaver line in Louisiana in October pulled 11 animals over two days in 68°F weather. He delayed skinning on three carcasses overnight without cooling. Those three pelts showed significant hair slippage along the belly — a loss of roughly $40–$60 per pelt at market. The other eight, cooled immediately in a portable cooler, graded prime. Same trapper, same line, same season. The difference was temperature management in the first hour.
Skinning Techniques: Cased vs. Open — Which Method Is Right for Your Species?
The answer depends entirely on the species and the end market.
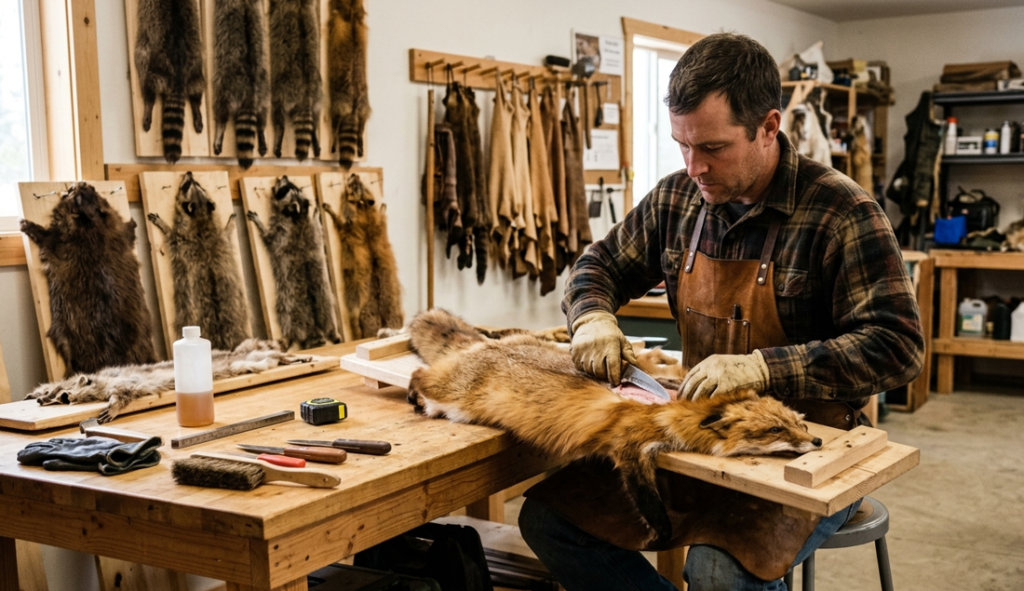
Cased skinning (tube method) is standard for most North American furbearers — mink, marten, fox, beaver, otter, and raccoon. The pelt is removed like pulling off a sock, preserving the natural shape for stretching. Open skinning is used for bear, bobcat, and coyote when a flat presentation is required for the rug or taxidermy market.
Practical Breakdown for Cased Skinning:
- Hang the animal by the hind legs from a gambrel.
- Make a clean cut from heel pad to heel pad across the back of the hind legs.
- Work the hide free from the hind legs toward the tail, severing the tail bone cleanly.
- Pull the hide down over the body using steady, even pressure — use a fleshing tool handle to separate membrane from hide where needed.
- Work carefully around the front legs, ears, eyes, and lips — these areas tear easily and damage reduces grade.
- Remove the hide completely, turning it fur-side in.
A sharp knife matters more than technique. A dull blade tears membrane and leaves excessive fat on the hide. Replace or strop your blade every 3–4 animals.
“Most beginners rush the face. Slow down at the ears and eyes. A torn ear or a cut lip can drop a prime pelt by a full grade — that’s real money left on the ground. Take an extra two minutes there.”
Fleshing: The Step Most Beginners Skip — and Why That’s Costly
Fleshing removes fat, membrane, and muscle tissue from the hide’s inner surface. Skip it, and you get rancid fat that burns through the hide during drying, causes odor, and attracts insects. A properly fleshed pelt dries evenly and resists spoilage.
Work the hide over a fleshing beam — a smooth, rounded surface angled at roughly 45 degrees. Use a two-handled fleshing tool or a dull draw knife. Stroke away from you, applying even downward pressure. The goal is clean, white membrane — no yellow fat, no red muscle tissue.
Think of fleshing like sanding wood before finishing. You wouldn’t apply stain to unsanded lumber and expect a clean result. The same principle applies here: the preservation step only works as well as the surface preparation beneath it.
- Beaver: Require the most fleshing time — a large adult can carry a quarter-inch of fat across the belly. Budget 20–30 minutes per beaver.
- Mink and Marten: Take 5–8 minutes each.
Stretching and Drying: Getting the Shape Right the First Time
Proper stretching sets the pelt’s final dimensions and directly affects its market grade. Pelts stretched too wide lose fur density. Pelts stretched too narrow appear small and grade down in size class.
Use wire stretchers sized to the species. The Association of Fish and Wildlife Agencies (AFWA) publishes standard size guidelines used by most fur buyers. For raccoon, a #5 or #6 wire stretcher fits most adults. For mink, use a board stretcher — wire distorts the shape.
- Slide the cased pelt fur-side in over the stretcher.
- Pull the nose to the tip of the stretcher and tack or pin it.
- Work the hide evenly down both sides — avoid pulling one side more than the other.
- The belly seam should run straight down the center of the stretcher.
Dry in a cool, well-ventilated space at 50–65°F. Avoid direct heat. A forced-air fan improves airflow without raising temperature. Most pelts reach initial set in 12–18 hours. Full drying takes 48–72 hours depending on species and hide thickness.
“Don’t rush the flip. When you turn a pelt fur-side out for final drying, the hide should feel firm but not brittle — like stiff leather, not cardboard. If it cracks when you flex it, you dried it too fast with too much heat. That damage is permanent.”
Preservation Methods Compared
| Method | Best For | Drying Time | Shelf Life | Main Tradeoff |
| Air drying on stretcher | All cased pelts, standard market | 48–72 hrs | 6–12 months | Requires controlled environment |
| Salt preservation | Flat pelts, warm climates, delayed processing | Immediate | 3–6 months | Adds weight; must be re-dried before sale |
| Freeze storage | Any species, long-term holding | N/A | 12–24 months | Requires consistent freezer; thaw carefully |
| Commercial tanning | Trophy, garment, or taxidermy use | Varies | Indefinite | Cost: $40–$150+ per pelt depending on size |
Choosing salt preservation for convenience means you gain time but sacrifice ease of transport — a salted beaver pelt can weigh 8–10 lbs. Freeze storage gives you the longest window, but a single power outage or freezer burn event can destroy an entire season’s take.
Regulatory Compliance: What You Must Know Before You Sell
Fur sales in the United States are regulated at both the state and federal level. The Lacey Act prohibits trafficking in wildlife taken in violation of state law — meaning improperly tagged or unlicensed pelts can result in federal charges, not just state fines.
Key compliance points:
- Maintain harvest records by species, date, and location.
- Follow your state’s tagging requirements — many states require immediate tagging of beaver, otter, and bobcat.
- CITES Appendix II restrictions apply to bobcat and river otter exports — documentation is required for any international sale.
- Check your state wildlife agency’s current season dates and bag limits before each season.
The Association of Fish and Wildlife Agencies maintains current regulatory summaries at www.fishwildlife.org. The International Fur Federation publishes handling and welfare standards used by commercial buyers at www.iftf.com.
The Difference Between a Good Pelt and a Prime Pelt
Prime fur means the animal was harvested at peak pelage — when the underfur is fully developed and guard hairs are set. For most North American species, that window runs from late November through February, depending on latitude.
A pelt harvested two weeks early can lose 20–30% of its market value. A pelt handled poorly after a prime harvest loses the same. Both errors cost the same money. Only one is within your control after the trap is set.
Handle every pelt as if it’s the best one you’ll take all season. Because sometimes it is.